Bottom Line Up Front (BLUF):

Yes, the rumor is true: there’s a Fandango GiGi (aka, Gravel Grinder) hanging in our garage. Now, what does this mean? Well, if you know anything about us, it could mean something, or nothing in terms of a long-term change for us.
Here are some additional details:
What’s it doing in our Garage?
- The GiGi “could” end up becoming a permanent replacement for the Ventana, but that’s wholly dependent upon Miss Debbie re-discovering her passion for riding off-road that has gone missing for many, many years.
- If we find that Debbie’s good with gravel grinding and city riding, the GiGi may become a replacement for the Ventana as an all-roads tandem.
- If we find that Debbie’s only slightly interested in playing in the dirt and not really ready to dive into it on a level that would make the GiGi a good bike to add to our fleet, then we might see what we can do about “de-tuning” the Ventana to make it more of a gravel grinder, e.g., rigid rear triangle in place of the rear rocker and suspension as a rigid for lighter duty front fork in place of the Stratos S6.
- We also might decide the Ventana just needs to go, as it really has no place in our stable going forward and could deliver some good times to others. That means would could either, (a) not replace it at all and get by with our road tandem, or (b) consider finding a used rigid tandem that could be turned into a budget “gravel grinder / city bike” for those rare occasions when opportunities present themselves.
- Sadly, the way I’m wired does not always yield simple answers to simple questions. The easy answer is… add the bike. But, to be honest, our Ventana has never been used the way or nearly as often as it needed to be used and I don’t want to make the same error twice. Instead, the GiGi and Ventana may both need to go to new homes where they will see far greater amounts of use that deliver miles of smiles to appreciative owners. The latter sounds pretty good to me, since I’m more interested in making sure others are able to enjoy riding two-up,
- In summation, we’re going to give it a shot! But, the outcome is far from guaranteed even though WE REALLY LIKE THE GIGI.
- More to follow.
What Did Alex Have In Mind When Developing the Bike?
So, what all goes into building up a Fandango Gravel Grinder, aka, GiGi? Actually, I had to do a bit of digging to find the backstory on the frame design as well as the build kit that was used for our GiGi. I’ve attempted to differentiate my writings by keeping the typeface in black while using other colors when quoting other writers from things I’ve found on-line, mostly at the S.O.O.R.T.A. Facebook Page which some of you may have already frequented: my apologies for re-posting to you.
In theory, and per Alex at MTB Tandems from a post back when he launched the bike in the latter half of 2019 (oh how I miss THOSE days), “… the frame and tube set design is geared toward all-road capability, and is less “burly” than the Fandango MTB tandem frame. Plus the lower BB height (about 1.75″ lower) and under-the-boom tube cable routing also make [single track] ST riding less of a viable option. We could make it burlier, but that also makes it heavier as well.”
Going further, and response to another avid off-roader, “With tandems, there are always compromises! The drop-bar Fandango (on the mtb frame) had the geometry challenges associated with drop bars on long mtb frames – high BB, long front-center, small in-frame spaces. Our intent was to build a tandem that filled that niche better. Given that a Fandango mtb frame does pretty dang well on singletrack, the obvious choice was to make something more road-worthy in the sense of fit and geometry. But there are always compromises. That being said, if there was a call for a beefier frame version, anything is possible.”
So, Let’s Walk Through The First GiGi Build:
So, yes… as already noted, I poached this off of the S.O.O.R.T.A. forums at Facebook since it gives you a good companion piece what’s already been written about the first one or two GiGi tandems that have found their way into to owner’s hands. My own description of the GiGi that followed us home is a bit more detailed and follows a bit further down the page.
 Anyway, from the S.O.O.R.T.A. post came these photos and words: “GiGi build #1 pics. This is a Large-Size, Level 4 build – SRAM AXS 1×12 (550% range) build, carbon rims. 33lbs as pictured. Level 1, 2 and 3 builds forthcoming.”


As one customer who talked to Alex learned after the GiGi was launched and who took delivery of this bike, “I love the bent headtube. There are a couple of other new neat things that will come out about this bike later. Pretty excited to have the first GiGi in the garage for some gravel testing this weekend. The attention to detail in this bike built for two is pretty awesome. SRAM Force AXS, White Ind hubs and Nox rims, Enve Carbon, Thomson components…. only the best. Full review coming soon!”


Again, from the S.O.O.R.T.A. post, “This GiGi and an identical small size will be seeing some gravel and dirt roads over the next few weeks for shake-down testing of the build spec. Note that the GiGi is truly a purposed designed bike for gravel grinding and riding bike packing and other unimproved roads of all persuasions: it’s not a single track tandem given that it only has a 11″ bottom bracket height. “


First Ride Review On The Size Small GiGi Gravel Tandem:
I poached the above headline and the following remarks off of the S.O.O.R.T.A. forums regarding the first impressions that came from the GiGi rider who picked up the second-one, the small size frame also in Minty Green, who knows a thing or two about how to ride bikes and tandems of all types. I only wish I could ride at their level and write as concisely:
Short version:
If you have the means, buy one. It’s that good.
Long version:
We picked up the small GiGi frame and headed to the Jake / Bull Mtn trail complex in North GA this past weekend to put the GiGi frame and component spec through its initial paces. Bull Mtn offers a little bit of everything for this mixed surface grinder – single track (ST – not recommended due to tubeset spec & low BB), gravel roads and pavement. Admittedly, though Alex explicitly told me this tandem isn’t intended for ST, he also told me to really ride it so, I couldn’t resist some choice Jake Mtn singletrack.
The small GiGi is setup with SRAM Force AXS 1×12 wireless, electronic shifting with a 9-50 cassette and a 34 tooth front ring, TRP Spyre cable operated disc brakes, Nox Citico carbon rims on White Ind hubs with the remaining spec somewhat standard to other high end builds MTB Tandems is known for (Thomson bars/posts/stems, WTB saddles, etc.). One exception is the one piece titanium stoker stem – a thing of machining beauty.
Aesthetically
The minty green colored frame, black accents and brown bar tape are very pleasing to the eye. Alex and Kim did a great job with the color selection for this bike and if it rides as good as it looks, it’ll be a winner.

First Up: Single-track, gravel roads and pavement
After sorting out our saddle heights and positions, we aimed to put in about 20 miles on GiGi while covering some single-track, gravel roads and pavement. With single-track right out of the parking lot, we immediately noticed the quick and nimble steering afforded by the frame. It turned easily and with the low bottom bracket and tracked very well on the root covered red clay surface. The size small was spec’d with a 40mm wide drop bar for the Captain, which took a few minutes to get used to. I typically ride a 44mm drop bar, so the decreased leverage on the bar was something I had to pay attention to for the first few minutes (I presume that buyers will be able to spec the width bar they need). On single track, the tandem was smooth and fast. The ENVE fork and 2.1” Schwalbe G-One tires soaked up front end bumps remarkably well. We both also noticed that the smaller and thinner diameter aluminum tubeset rode much more like a high quality steel frame with good damping characteristics than a rigid and stiff aluminum frame. The brakes were adequate for ST work though a hydraulic version would be preferred. We didn’t pedal strike at all despite aiming for the worst lines we could find. Maybe not designed for single track, but it surely didn’t disappoint in the several miles we rode.
Next up: Gravel
This is what we’re really here for. How does GiGi handle gravel? Really, really well. That same smooth, high quality ride characteristic we felt on ST was more evident on gravel. The light weight build combined with the very pleasing, and fast, shifting provided by the AXS groupset, had us moving along faster than our normal gravel pace. Again, we aimed for potholes filled with water, lines with loose gravel and generally tried to upset the chassis. It responded very, very well with my only concern centered on keeping control with the 40cm bars. We successfully made several u-turns on narrow gravel with no issues thanks to the steep(ish) head angle and low bottom-bracket. The carbon wheel set spun up quickly, the ENVE fork kept the front end planted and damped and the AXS shifting was just…. awesome. I’m generally old-school when it comes to technology but, AXS was great. I’m sold and would love to have it on all of my geared bikes and MTB tandem. We did find that even in hilly North GA, we didn’t need the very low gearing afforded by the 9-50 cassette. That might change at the end of a looooong gravel ride, but if you’re a flat lander, you might consider a closer-ratio cassette without the extra low gearing. GiGi was great on gravel, as expected.
With a run on single-track and gravel, we headed up to the black top to put in some pavement miles. There’s not a lot to say here except that the as-built bike just glided along effortlessly. The G-One tires really shined as well. They handled some ST, gravel and pavement without humming like a monster truck tire. I’m not sure that the 1×12 gearing would give you sufficiently tall gearing for super fast pavement runs, or group rides, but a conversion to a 2x chainring setup would probably be more than enough. GiGi rode great on pavement and the overall build spec really emphasized the “all-road” nature of the tandem.
In summary…
We really enjoyed the ride. So much so that we are swapping the 40cm bars for some 44s and will ride GiGi instead of our TiDango gravel bike in a 60-mile gravel race this weekend south of Atlanta. Speaking of the TiDango… hey Alex, do you take trade-ins😎?
So, what would I change, or what didn’t I like? First of all, obviously the bars. You need to be sure to spec the correct reach and width of drop bars to get the fit you need. It’s really important to do so. Secondly, I would spec hydraulic discs vs the cable operated. Though they worked fine, hydraulics are just that much better and, can you ever have too much braking power on a tandem? Third, this frame-set is really intended as an all-road frameset vs a singletrack shredder. Maybe that’s obvious but, in this day and age where so many two-wheel machines are marketed as a quiver-killer, it’s important to know that this one isn’t. Even then, it’ll be really, really hard not to connect gravel roads with the occasion piece of singletrack… it’s just that smooth.
Next up:
After swapping bars, we’ll put GiGi through the paces in this weekend’s gravel race. Next is a long run on the silver comet trail out to Alabama and back (200 miles total) and third, my brave stoker is trying to convince me to do some bike packing around the Cohuttas with GiGi as our sled. I mean… Alex did say to ride it, right? 😁😁
So, What Does A GiGi Actually End Up Looking Like In The flesh?
Yeah, well… with just one ride under our belts and having run my fingers over the frame I can tell you that this is about one of the best designs to come along in over 20 years in terms of being a do-all bike with the latest technology.


But, before getting into our first impressions let me take a minute to walk you through what the “Fandango GiGi” that followed us home — which is easily a Level 4 (or perhaps even a Level 5) — looks like on paper and by the numbers based on me inspecting the bike to see what all went into the build, as best as I could determine:
- The Frame & Touch Points
- Fandango GiGi Specific Geometry / 6061 series aluminum tubing
- MEDIUM/SMALL
- Captain’s TT: 22.9″ (1.4″ shorter than Fandango S)
- Captain’s ST: 20.5″ (3.0″ shorter than Fandango S)
- Stoker’s TT: 28.6″ (Same as Fandango S/L)
- Stoker’s ST: 15.75″ (Same as Fandango S/L)
- BB Height: 11.5″ (1.5″ lower than Fandango S/L)
- Standover:
- C = 31.9″ (1.9″ taller than Fandango S)
- S = 26.5″ (Same as Fandango S/L)
- Seat Posts: 27.2 mm (Same as Fandango S/L)
- Headset: ZS 44/56 (1.5″ for Fandango S/L)
- BB Width: 73 mm (Same as Fandango S/L)

-
- FSA No. 51 Headset (8mm alloy 1-1/4″ to 1.5″ Steerer)
- ENVE All-Carbon Mountain Fork with 15 x 110mm (Boost) Solid Axle, Adjst. Rake
- Thomson Captain’s MTB Stem w/Ritchey Comp ErgoMax Drop Handlebar Aluminum 31.8 42 BB Black 4.6 Degree Flare
- Control Tech Stoker Stem w/CoMotion Stoker “Bullhorn” Handlebars 31.8mm handlebar clamp diameter w/46cm width
- Thomson Elite Captain’s Seatpost w/Customer provided Selle Italia Saddle
- Kinekt 3.1 Carbon Fiber Seatpost w/Customer provided F’zik Saddle
- Customer provided Speedplay Frog Chromoly pedals, front & rear


- Drive Train
- SRAM Force ETAP AXS Shifters
- Middleburn RS8 X-Type Through-Axle Tandem Cranks w/32t timing rings 36t drive ring running on FSA Mega Exo Cartridge Sealed Bottom Brackets
- SRAM XX1 Eagle AXS 1 x 12 Rear Derailleur
- E*Thirteen TRS Plus 12 Speed Cassette 9-50T
- SRAM XX1 Eagle Chains / Gold Finish


- Wheels & Tires
- Front Hub: DT Swiss 240s Hybrid 36h, 15 x 110mm Thru-Axle Boost, 6-Bolt Disc
- Rear Hub: DT Swiss 240s Hybrid 36h, 12 x 148mm Thru-Axle Boost, 6-Bolt Disc
- F&R Rims: NOX Composite Citico 700C Carbon TCS rims, 29″ x 36h
- F&R Spokes: Sapim Force 13/16/14 butted spokes with Brass nipples
- F&R Tires: Schwalbe G-One All-Around 700c Tubeless Gravel Tire, 29″ x 2.25″


- Brakes
- Front Flat-Mounted TRP Hydraulic/Road (HY/RD), cable actuated hydraulic disc with Avid 203mm G2 Clean Sweep disc rotor
- Rear Flat-Mounted TRP HY/RD disc with Avid 203mm G2 Clean Sweep disc rotor.


Mark’s First Impressions:
It was around 1:30pm on this past Saturday, 21 November, when our friend Alex called to let me know he was back at the shop if I wanted to come on by and pick up our Fandango GiGi “trial” tandem so we’d have it for a short ride we’d likely take on Sunday. I took the Ventana up with us to (a) free up some room in the garage and (b) let him put his eyes and hands on it as a possible commissioned sale if we decide to keep the GiGi as an alternative tandem for our use on vacation trips, city riding, etc, after giving it a good trial run.
Let’s just say I was pretty blown away by the GiGi. And, quite honestly, there’s a lot of homework I’ll need to complete on this tandem that has has all kinds of “newer” technology than I’m used to dealing with or had a reason to take interest in. More on that below and in separate Tandem Blog Entry.
The after getting the Ventana unloaded and the Fandango GiGi loaded back in it’s place two things became immediately evident:
- The rigid GiGi with it’s oversized carbon mountain bike fork and rims is a good 10+ lbs lighter than the Ventana with it’s massive Stratos S6 dual crown suspension fork and rear suspension system.
- The GiGi is every bit as big — length, width and height — as the Ventana.
 Once I had it back at the house I pulled out the Calfee so I could begin to get the riding positions adjusted “well enough” for tomorrow’s 1st ride, to include swapping out the Kinekt 3.1 Carbon Fiber stoker seat post for an older Easton EA70 post I had sitting around, remembering that one of the things that has kept Debbie off of the Ventana mountain tandems has been the “bouncing effect” that comes from having any type of rear suspension.
Mark’s Initial Assessment:
In the old days we called this top shelf gear. Again, I had to look up most of this new stuff just to figure out what it was, how it worked and what I needed to do to it to make sure it kept working the way it was designed to. It suffices to say, no longer was the “torque wrench” one of the key pieces of equipment — yes, it merited a mention when the installation torque specs were provided — it was having a smart phone with blue tooth capability that was paired to the SRAM etap system so it could be used to “optimize” the shifting performance. Really? I feel like I’ve entered the twilight zone of bicycle tuning!
Seriously, as someone who has spent a lot of times “unscrewing” bikes that were screwed-up by the owners who knew enough to be dangerous with a couple of the right tools in their hands, this was a new realm of “OMG” where anyone who spent too much time screwing around with their smart phone adjusting the dimmer switches on their house could now screw up the shifting of their tandem while trying to impress friends with their ignorance of what they were really doing! I’ll have to check but I pray there’s a “reset setting” that will undo whatever a user has done to their SRAM etap system so as a mechanic I can start from a known and fix a problem instead of having to fix a bunch of problems just to get back to par!
But, settling all of those minor grips aside, it is rather interesting to see how some of what I accepted for high-tech — hydraulic disc brakes from Hope or Magura for instance who developed gear for pros and techcs — to what TRP has developed for the masses and Johnny Bag-of-Donuts mechanics who do the pre-delivery inspections and “tweaks” to these uber technology laden bikes of today that cost about as much as what we paid for a good used motorcycle just a few years back. Seriously, as much as some of what these bikes costs does beg the question, “what do you pay the mechanics?”
Mark & Debbie’s First Asphalt Ride:
 Sunday, 22 November, around 11:00am was when we took for first maiden voyage on asphalt fresh out of the box, as it were. Thankfully, my initial adjustments made on Saturday were about right-on for the first ride, something we were able to confirm with just a short detour down to our cul-de-sac before heading out on our 15-mile, planned shake-down ride.
As we headed down a small hill and then up and 8% – 11% short grade that is our entrance road / exit from the community I was very aware of two things: (1) the bike felt great, both in terms of how it handled the asphalt on those meaty 29″ x 57mm wide Schwalbe G-One All Arounds with the small “micro bobble tread” tubeless tires inflated to around 55psi, but, (2), those wide tires with their “micro bobbles” sure created a lot of noise and had a feeling of some added heft to deal with, either from rolling resistance and/or the added weight of the very large tire carcass.
But, that said…. after just a few moments in the saddle and on the road the handling because very intuitive — to include the rake, straight line stability as well as cornering behavior — which suggests the altered fork rake allowed by the ENVE Mountain Fork’s mounting system is set right where it needs to be for those large tires that ‘could‘ have easily been a source of some added and unnecessary pneumatic fork rake. And, I’d be remiss if I didn’t point out how comfortable it was sitting up there in a proper riding position for a bike that was intended to be at home on asphalt as well as unpaved and unimproved roads.
As for how the rest of the “gear worked” I will say that I liked the SRAM Force lever design and the way it was set-up by the shop, with the left hand lever moving the derailleur up one rear cog for each touch of the lever while the right hand lever moved the derailleur down one rear cog for each touch of that lever: again, very intuitive and quickly embraced even though I found myself missing the front derailleur on what is usually a 10 speed 9x34t rear cassette with a 53/39/30 triple chainring set-up in a few of the mid-range gears. The cable-actuated hydraulic discs seemed to work quite well “out of the box” and without being full bedded-in given that I don’t really put a lot of heavy brake action into the bike on this particular route. There was some noticeable brake rub between the rotor and caliper-mounted pads from both the front & rear brakes, but I doubt it was enough to create any noticeable drag or rotor heating.
Hey, that’s all the gear there was: shift up or down with one of two dedicated shifters or hit the brakes, front or rear with one of two dedicated shifters, both of which have very nice ergonomic shapes about them. Unlike our Ventana, there was no front suspension or rebound settings to think about, no rear suspension or rear shock settings to mess with, never mind “adapting” to the SRAM GripShift ergonomics and the need to move a front derailleur now and again. As for the Calfee that we were actually riding, it was also a much lighter task load, with the elimination of the front derailleur and having to think about which of two shifters, each with two paddles that controlled the direction of two different derailleurs.
As for Miss Debbie, she likes the gearing changes, found it to ride quite smoothly on the flats and downhill and to fit quite well, especially enjoying the bull horn bars: the Calfee will likely get a set of those and the triplet two sets. Honestly, I don’t think there was but one thing that bothered enough to make mention except for how “heavy” the bike felt to her compared to the Calfee, especially when climbing our frequent grades.
 Yes, Debbie was missing the Calfee on the climbs as the big meaty tires with their micro bobble tread made the GiGi “feel” like we were pushing a much heavier bike given the mass of the 57mm wide / 685 gram tires inflated to 55psi on the GiGi vs. the Calfee’s tires at 25mm / 240 grams plus the added 143 grams each tube inflated to 100psi adds to our rolling wheel weight on the Calfee. Now, interestingly enough, there was no real issue on descents or flats where the added rolling weight didn’t come in to play, just the harmonics of the micro bobble tread that served as a constant reminder we were riding a very different machine.
We also had an bit of a shock when we first stood up to climb out of the saddle on a short climb and the bike lurched suddenly and abruptly from one-side to the other on the first few pedal strokes before we were able to get the bike to “settle” and steer straight ahead. Our second out-of-the-saddle experience was far better since both of now knew what to expect and, quite honestly, it was in part due to the massive amount of pulling power Debbie now had with those 46mm wide bull-horn bars to crank on vs. the more narrow and shorter 42mm drop bars with stoker rests she was used to pulling on that put a lot of “body English” into the frame’s left to right hand movements when we first stood up.
Interestingly enough, when we got the bike back to the house I decided to quantify just how much of a weight difference there was between the Calfee as we normally ride it vs. the GiGi whose weight really doesn’t seem like it’s all that much more than the Calfee. Well, son-of-a-gun, the digital scale provided the truth: The Calfee without water bottles or the seatback with tools weighed 32.76 lbs and the GiGi a mere 34.70 lbs with just a pair of carbon bottle cages still on the bike. Now, one needs to bear in mind that our Calfee has four rather large couplers that add 2.6lbs to the total frame weight and it also has a frame mounted tire pump that adds another 1lb or so, its cited weight of 32.76 is a bit overstated unless you’re comparing it to other conventionally coupled travel tandems. Getting back to Miss Debbie, while was definitely not ready to give up the Calfee for use of our road rides, she was shocked that the GiGi was only 2lbs heavier than the coupled Calfee given how much heavier it felt on those climbs.


Mark’s Cynical Self?
I wouldn’t be true to myself if I didn’t share a few of my cynical first impressions; you know, the things that keep me honest to my old-school cycling roots. With that in mind, I sort of wish I had a 5-year old, US-Made Cannondale MT800 sitting around that I could compare the GiGi to, as it seems like a better point of reference than our 1998 C’dale, or either of the Ventana rigs with their massive knobbies. This is probably a compliment to the well-positioned Fandango GiGi in the marketplace that truly does have one new growth area to exploit: the All-Around Bike that can be used the way the Schwinn Typhoon’s we grew up on were used: for everything!
 Sure enough, we’d ride these things to school with our books stuffed in rear baskets or a front, handlebar mounted bag and we’d ride them there on their balloon tires down chip-sealed roads, the dirt covered trail that began at the end of the street to get ourselves over to the gravel covered, old Cable Car track bed. And, after school we’d take these 45lb monsters out and ride them in the make-shift dirt tracks we built near construction sites, or use them to pick up a 100lbs of newspapers that we’d deliver on our afternoon paper routes when it was decided that “we needed a job” at a certain age. So, the price point is definitely different because the technology has come along way, but there’s still a market out there for a do-everything bike for lots of price points, and this GiGi frame is clearly a great place to start with a higher-end version of that do-everything bike but for two people, not just one.
Now, this is where you get to my more pragmatic standpoint, given that the GiGi we’re playing with is about as high-end as you’ll find when it comes to any bike that has been outfitted to be an all-around / do-everything machine, lest I refer you back to the equipment list of top shelf componentry. And, in that vein, it would be interesting to see what could be achieved in terms of what the lowest-end / but still reliable and durable equipped GiGi might look and handle like, as I can definitely see another element of an underserved market out there for a bike like this that can be parked at the corner store or beach access point with a cheap lock to keep the target of opportunity thieves away while a retired couple on vacation who are staying in an RV or a nearby Bed & Bed are out exploring the area on something that they’re not afraid using that way. Just a thought, not the result of having done market analysis, which sort of goes to my point about wishing I had an older Cannondale Los Dos to compare the GiGi to instead of our Calfee road tandem or the Ventana off-road tandem, neither of which are do-it-all machines as currently configured or used.
So, What’s Next?
Well, more riding! At least, that’s the plan. We (OK, I) can’t wait to see how it performs in the city and on a gravel / dirt trail or two over the next days and weeks. And, in that vein, we’ve asked some folks via the S.O.O.T.A. and Tandem Lists on Facebook for recommended gravel trails, with our thanks to those who have thrown out a couple suggestions.
We may have a target of opportunity in that some friends who ride tandems from out-of-town will be in the area next week that could provide us with the excuse we need to search out some of the more local trails that we can explore and gain some tips and insights from folks who have already embraced the gravel grinding / trail riding genre which is not something we’ve done.
There are some techi-things that I also need to learn and apply to the tandem in regard to getting the tire selection nailed down for what we’ll need vs. what we ‘might’ need, as well as getting the brake rotor drag adjusted out and perhaps spending a little time experimenting with the Kinekt 3.1 Carbon Fiber stoker seat post that does look to have some potential for Miss Debbie. Well, OK, probably not… but it does look like a better mousetrap than most of the other rear suspension options I’ve seen and I can imagine that having a well-tuned stoker suspension seat post could be a good thing to have when it comes to tooling around on stone pavers or trails with less than perfect conditions, e.g., pot holes or broken asphalt. Yesiree, there’s lots about this bike that could keep me and us busy for quite some time, both in the garage and out exploring!
So, How Did We End Up ‘Falling-Out’ Of The Off-Road Tandem Thing?
Well, it actually goes back to a very long way… almost 20 years to be honest. This post from 31 October 2013 does a pretty good job of capturing where we were back then we I first realized that off-road tandem riding was fast becoming a past-activity for us.
Posted on October 31, 2013 by TG
 Yes, it’s true. That particular chapter may have come to a close.
My acid test for confirming our time riding off-road tandems together may have truly come to a close with a very low likelihood of a sequel was driven by the inclusion of the Ventana in my liquidation list of bicycles, then solidified this morning when I asked (and I’m paraphrasing), “So, are you sure you have no interest in off-road riding. Once the Ventana is gone, it’s gone and it won’t be replaced: the cost of re-entry is just too high.” There was zero hesitation by the lovely Miss Debbie in her response: Yes, I just have no interest.
I’m sure my body language wasn’t supportive, as I’ve been going through the entire Kübler-Ross model and didn’t get to the final stage until 5:45am today; you know… that denial, anger, bargaining, depression and acceptance thing.
Denial is what has allowed me to keep the Ventana hanging in the garage far longer than it should have without being ridden, other than my solo spins around the block as part of my Preventative Maintenance program. Anger has been a recurring theme too, but one I’ve internalized for the most part. Well, I say internalized: I’m sure I was a bit more transparent than I’d like to think. Bargaining was something I only tried briefly in a last ditch effort to “re-light” interest in off-road tandeming by offering up “one last try” before we call it quits. Alas, that last ride never came to pass. So, having gone ahead and including it in the liquidation list I drifted into a bit of a depression over the past 24 hours and finally reached the acceptance phase today. Well, OK: this blog entry is part of that acceptance phase so once I finish composing it THEN it will be a done deal, short of actually selling the thing.
So, how did I get here? Debbie simply lost her interest in off-road tandem riding at some point. In talking about it, it seems that there were a number of contributing factors:
 Despite sending her to the Chiropractor after each ride, the off-road tandem that she always enjoyed the most and felt most comfortable on was our 1998 Cannondale MT3000. It was low-to-the-ground, sure-footed and confidence inspiring. And, because it was a hardtail, it also had its limits… which Debbie may have appreciated.
 Our 2nd off-road tandem and 1st Ventana El Conquistador de Montanas was also a bike that she grew to like, but it was still not as confidence-inspiring to her as the Cannondale. The rear suspension was something she never really came to feel comfortable with, even though it eliminated post-ride back pain. In some respects, I think it was the more aggressive riding that the full-suspension enabled that may have really been the source of her discontent.
- Sadly, many of the friends who we’re the catalyst for our off-road rides moved away and given the amount of time and effort it took to get the tandem to the trails vs. having the ability to ride our road tandem from the house didn’t make “getting out to ride” all that much easier to maintain the interest.
 Our 3rd off-road tandem and 2nd Ventana ECdM, it turns out, is a bike she’s never liked to ride. I did not learn this until a couple years back when we borrowed “Casper” from Alex Nutt… and Debbie shared that she really felt a lot more comfortable on it vs. our own Ventana.
- Ultimately, it was that very same visit to Rope Mill Creek where Debbie thinks she lost her desire to ride off-road. She’s not been able to pin down exactly what it was, but something about that outing became a watershed moment for my sweetie.
Someone who knew about my Debbie’s loss of interest once asked, “Why not just find someone else who wants to ride with you?” On the surface and from a selfish standpoint that was something I’d already considered but then quickly dismissed. After all, while it’s easy to ride with an enthusiastic partner it just doesn’t work when they’re a “replacement player” since the real fun was having my sweetie out playing in the dirt with me.
Someone’s going to get an awesome machine… that much I know. Strangely enough, I’m not having any qualms when it comes to liquidating the Erickson tandem; weird. Guess I’m more monogamous than I realized?
Our good friend Alex at MTBTandems has let me know that should we decided we ever need an “off-road tandem fix” we can always “demo” one of the tandems in the shop. So, while I’m not sure that will ever come to pass, it’s good to know we have some options!
It wasn’t until the late September 2014 that Miss Debbie agreed to go and give the off-road thing another try. This is an account of that change in future riding plans…
Posted on September 21, 2014 by TG
 Regular readers may recall that in October of last year I was less than optimistic as to whether or not Debbie would ever give off-road tandem cycling another shot. The full details of my dilemma at the time were covered in a blog entry entitled, No More Mountain Tandem, sniff, sniff.
I’m not sure why, but I continued to hold out hope she might at least give me one last chance to re-introduce her to off-road tandeming before selling-off our 2002 Ventana full-suspension tandem which had not been ridden since April 2010. Our last off-road tandem ride was in November 2010, but on a newer Ventana (Casper) that Alex Nutt from MTBTandems.com had let us borrow.

Interestingly enough, about 1/2 way through that ride Debbie had told me she liked the white Ventana more than our 8-year old, under utilized Ventana. However, by the end of the ride and unbeknownst to me, she had pretty much lost her nerve and interest in riding off-road. To this day she can’t pin point why, but that was the last time we put two tires in the dirt.
I never really got serious about selling either the triplet — which has only seen use at a few tandem rallies and gatherings of tandem friends for rides up in Tennessee — or the Ventana as even a remote chance to ride either bikes at some point in the future was all I needed to justify holding on to the bikes.
Even though Debbie had agreed she’d give it one more try last winter, whenever I followed-up on her offer she just didn’t feel like it or was more interested in riding the road tandem. So, about every six weeks or so I’d bring it up, usually after riding the local loops on my single mountain bikes but with no success. This weekend some friends shot me an Email asking if we might still be interested in selling the Ventana which gave me one last shot to see if Debbie would give it a try: this was definitely an either / or question. Either we give it a shot and confirm that the Ventana has a place in our future riding plans or sell it… to our friends (if it fit and suited their needs / budget) or someone else.
Her initial response was, let’s just sell it. However, I persisted and asked her to give our very nice and not-all-that-technical trail a try on the Ventana, noting I would put about 270lbs of air pressure in the rear shock to minimize the frame bob that she has never liked on either of our Ventana full-suspension off-road tandems. Moreover, the way the trail is laid out, the first mile was pretty much a dirt road with just a couple turns, a very small water crossing and a bridge leading to the actual trail. Therefore, if that first 1/2 mile or so wasn’t enjoyable, we’d simply turn around, call it a day and sell the Ventana.
Much to my surprise, her next question was, “Do we still have the Camelbaks?” I said yes and she agreed to give it a try!!!! Talk about doing the happy dance on the inside; I was jubilant but tried not to show it.
Although there was a little trepidation when we woke up this morning, the weather was so nice that it made the idea of a nice tandem ride of any type a very inviting thing. I got the Ventana ready, which really didn’t take a lot of effort: I do periodic maintenance on all of our bikes so they’re pretty much ready to go with just some air in the tires. However, I needed to move some pedals over to the bike and wanted to double-check the rear shock to make sure it was still holding air from the last PM a couple of months back: it was. I just needed to top it off to be certain that I’d minimized the pedaling-induced bobbing our Ventana tandems had always exhibited. With the front wheel installed, air in tires and a successful solo test ride to the end of our street completed, I slid the tandem into the back of our Toyota Tundra on its side with the front wheel resting on the tailgate in the down position; we were good to go.
We made a couple of short test rides in the dirt parking lot of our local trail and after getting Debbie’s saddle raised up a bit we were off. At the predetermined end of the access trail I asked Debbie; “So do you want to continue or should we head back?” She said, so far so good. I skipped the extra 1-mile loop that adds some higher technical climbs and descents to the ride which Debbie said she appreciated. My sense that our local trails would be more to her liking was spot-on: she really enjoyed our short loop ride. She said she got a good workout, felt like she was able to put power into the pedals without the tandem sucking her energy away with suspension bob, and really didn’t mind the tight corners, narrow tree gaps and other features of the trail. She was very pleased that we were able to easily clear a couple features that I thought might have required a dismount and portage.
Riding the Ventana with Debbie aboard for the first time in 4.5 years was a bit of a re-learning experience for me. I definitely forgot just how much positive steering control was required to keep the Ventana headed where I wanted it to go: I probably need to move the triple clamps to see if I can’t add some steering trail. Over the past 4.5 years I’ve also moved to a more upright position on my mountain bikes, so I was also dealing with being in a much more leaned-over, aggressive riding position than I’m used to. One thing that hasn’t changed with our Ventana that I really wish would was disc brake squeal: I suspect it’s the four piston design.
So, I think I have a green light for some return visits to the local trail over the winter which is goodness. As to whether or not we’ll sell the Ventana, having had it in my hands again I’m pretty sure it’s too small for our friends who expressed an interest in the bike: the fork steerer would have needed to be at least another good 2″ – 3″ for the captain’s bar height to be correct and his wife would need a very long seat post as she’s quite a bit taller than Debbie is at just 5’2″. There are definitely a few things I can do to it to make it “good enough” to take us until next spring, during which time we’ll really know if off-road riding will be something we do more often.

From the archives: While fooling around at Sixes Road back around 2008, I misjudged the steepness of a drop-off and caught Debbie’s pedal at the worse possible moment. We ended up in a pile at the bottom of the berm thankfully laughing and unhurt. I don’t think Debbie has ever forgotten that or any of the other bumps and bruisers she’s collected riding off-road.
I don’t see us heading off to any trails that are super technical or with advanced riders, as I suspect pushing past Debbie’s comfort zone — and some spills — is what took a toll on her confidence. It’s also noteworthy that she has some bone density issues, which makes the risks associated with a fall in the woods higher for her than the average person who lands on a rock, root or clips a tree with a shoulder.
I can definitely see that a visit to MTBTandems with our bike is in the near future, as I do need to get my stem height and reach sorted out and will most likely move over to Avid BB7’s instead of screwing around with floating rotors for the Hope hydraulic disks that continue to squeak and shriek.
Things were looking up after that 2014 return to riding and I even made time a week or so after that triumphant return to the dirt to make a visit back up to MTB Tandems so see about making some changes to the Ventana.
Posted on September 28, 2014 by TG
As noted in my post from last weekend, after a triumphant return to off-road riding with Miss Debbie, our 2002 Ventana El Conquistador de Montanas (ECdM) definitely needed a few adjustments following its 4-year hiatus.
#1 on the list was raising and pulling back the handlebars. Twelve years ago when Alex built-up our 2002 ECdM — which, coincidentally, was the first full-up tandem to be sold by Alex and MTBTandems.com — I was apparently 12-years younger and riding with a much more aggressive posture. The ‘Superdust’ 2002 Ventana ECdM was a replacement / upgrade from our 1997/00 ‘High Zoot Translucent Red’ ECdM which had replaced our ‘Sunrise Orange’ 1998 Cannondale MT3000. As you can see in the photos below, the captain’s handlebars are well below he saddle on all three bikes: I guess there was a time when that worked well for me. However, on last Sunday’s outing I was definitely feeling way too stretched out, bent over and had too much weight on my hands.

2002 Ventana, with Stratos S5 fork, SRAM X0 gearing, daVinci tandem crankset ,Chris King/Aeroheat AT wheelset and Hope Enduro hydraulic discs. When our friend Alex Nutt decided to get into the off-road tandem business we decided to take the plunge and do a full bike upgrade to support him with his first tandem sale & build. We had Sherwood Gibson at Ventana replicate the geometry of our ’97 frame as the current smaller frame geometry had changed to something that I didn’t find aesthetically all that pleasing. Sherwood and I were on the phone talking frame geometry while he was building the frame, that’s how custom this bike was. In fact, Sherwood even signed the frame for me, just to give it that really custom touch.

1997 Ventana frame built up in 2000 with Stratos FR4 fork, Shimano XT, daVinci crankset, Hope BULB / Aeroheat AT wheelset & Hope 04DH hydraulic discs. I found the frame for sale for $1000 on some obscure bulletin board during Christmas of 1999. It had been bought at a UPS lost freight sale by a pawn shop in South Dakota. It was shipped to a buyer and lost in route by UPS and was in cosmetically rough condition. A lot of polishing, new decals and a new rear disc compatible swing arm made it good as new and built up in May of ’00. I wanted to update the wheels, gearing and brakes and decided to do a complete bike upgrade when our friend Alex decided to enter the off-road tandem business. This was sold to a couple in Sacramento, California in April 2002; however, UPS lost the wheels and fork en route. Me thinks this frame was cursed.

1998 Cannondale MT3000 with CODA HeadShok Moto FR fork, SACH Gripshift, Sugino crankset, Coda-Hugi / Sun Rhinolite wheelset and Shimano XT V-brakes. This one was acquired lightly used from a gentleman in Pennsylvania in Dec. ’98. I stumbled over a Ventana frame that was a deal just too good to pass up and this bike was sold to a couple in New Hampshire in July ’00. To be completely honest, I really wish we’d have kept this tandem. It was a ripper on cross country trails. Very easy to ride and handle with it’s low center of gravity vs. the very high ground clearance Ventanas which can be a handful.
Therefore, the first order of business was to figure out what stem and riser-bar combination would deliver a better riding position. Alex had a Thomson stem that was 10mm shorter than the one I had on our Ventana and a set of FSA XC280 40mm mid-rise bars that we used to pull back and raise up my riding position. The plan is to ride it with the FSA XC280 set-up on a temporary basis to see if that will work or if I still need a more upright solution. Just testing it in the parking lot outside of MTBTandems.com’s shop in Canton, Georgia, it seemed to be a lot better.

 The next order of business was eliminating the noise and chatter from the brake system: chattering brakes don’t work well and the squeal is just… well, not what you want every time you touch your brakes. As you can see in the photos above, to the right and below, we ended up just eliminating the entire brake system. Yup, those way-cool, super-gonzo, bomb-proof 4-piston hydraulic Hope Enduro front & rear brakes are now in a box along with the also very cool Easton C2 composite handlebar that was replaced by the aluminum riser bar. While the Magura MT7 and MT6 hydraulic brakes were quite tempting, for our immediate needs my gut told me the mechanical Avid BB7’s with the Single Digit 7 levers would more than adequate and… well, simple, quiet and more affordable. Out back, in addition to switching over to the BB7 mechanical (left), we also upped the rotor from 185mm to 203mm which completed the scorched-Earth approach to riding the Ventana of the Hope brake system. As to why there was a 185mm on the rear to begin with, I’m pretty sure 185mm worked out to be the largest size caliper Hope (right) made for a rear installation back in 2002.

 I also rotated the eccentric 180° to lower the crank axle a half inch which, in turn, allowed me to drop my saddle height another half inch: yet another way of changing that bar height to saddle height differential on a tandem.


To add more steering trail and firm up the steering I raised the triple clamps back to the top of the stanchions which relaxed the head tube angle and increased the steering trail. Yes Alex, you were right… I’d originally focused on the effective fork rake. Alex correctly pointed out what was happening to the head tube angle as the fork stanchions move up or down in the clamps.

If the weather gods are nice and hold off on the rain, Miss Debbie has said we’ll hit the trails this morning after 10am when the bow hunters are done. It will be interesting to see how all of these changes have worked out. Keeping my fingers crossed that we have another good day on the trail.
Sadly, even though we had a good outing on the reworked Ventana shortly after the September rework visit to MTB Tandems, riding off-road after that didn’t happen again until 2016, just ahead of Father’s Day when Debbie agreed to give it another try since it was something I really wanted to do.
Posted on June 25, 2016 by TG
Playing in the Dirt Again!
As long-timer tandem cycling friends may know, we did a lot of off-road tandem riding back in the late 90’s / early 2000’s.

However, we had a few group rides where the terrain and tempo of the ride became a bit too edgy for Debbie and that pretty much curtailed future off-road tandem rides for several years. We’d give it a try every couple of years, but the anxiety remained high and kept us from getting back into a regular off-road riding regime that could have helped to rebuild the trust and confidence she’d need to overcome the fear of a fall. So, you can imagine how excited I became when she volunteered that she’d give it another shot as my Father’s Day gift. Suffices to say, we had a blast!
 We rode two of the moderate skill level trail loops and had only one or two dabs. Of course, on one I smacked my knee against the tandem’s handlebars when it abruptly stalled-out after both the front and rear wheel hit two perfectly spaced roots at the same time as we were pedaling through the dead spot on the crank circle; ugg! However, Debbie was unscathed after our 15-miles of trail riding and also in very good spirits. It probably helped that I didn’t try to push the pace too hard, noting my skills piloting an off-road tandem were a bit rusty. But, I think there were a few other things that helped, including just the sheer fun and joy that comes from riding a mountain bike on single track in deeply wooded terrain and of course the comments and attention an off-road tandem can generate when other cyclists see it out on the trail… and there was a good bit of that.
 Regardless, I was very encouraged to hear Debbie suggest we put tandem mountain bike riding back into our weekend riding regime which would be just awesome! Of course, as I discovered with both of my single mountain bikes earlier this year, tires don’t last forever and the rubber on our Ventana El Conquistador de Montanas (ECdM) is easily over 10 years old. So, you can bet I’ll be putting some fresh tires on it this week so if the weather cooperates and we can find the time for it, we can enjoy a bit more traction next time we return to the trails. The next thing on the to-do list is to see if a local motorcycle and off-road bicycle shock specialist can rebuild our Stratos fork, as the seals are definitely starting to leak. Hey, the poor bike and fork are 14 years old… it’s earned the right to squeak and creak a bit.
So, What Happened?
Sadly, even though we had a good outing on the reworked Ventana shortly after the September rework visit to MTB Tandems, riding off-road after that didn’t happen again… at all. Nope, it’s not been since 2016 that we’ve headed out on the off-road tandem, despite getting it back in top form and also getting myself in much better shape and spending more time on the off-road bikes.
In fact, it was towards the end of this September of this year — a year that has been redefined by COVID-19 and cancelled events and trips — when I realized off-road tandem cycling and, to a lesser extent, even road tandem riding was quickly becoming less than a priority with us at a time when we should have all the time in the world for it. In fact, I included an item in my weekly on-line journal, something akin to a personal diary that I write (a) for my mother and father to read as a way of keeping up with what we’ve been up to in a more personal way than the weekly phone calls, and (b) as a reference tool for me to use when I need to recall when something happened, was acquired or where we went when. So, from that 28 Sep edition came this:
Looking Forward:
I’m confident we’ll keep on enjoying our time on the tandem and will look forward to a time when tandem rallies resume. But, I think we’ve just about finished the transition from being “tandem people” to just people who ride a tandem. The same is probably true of cycling in general: I’m no longer a cyclist either, just someone who rides a bicycle now and again.
What brings this home is that we no longer have a close group of friends within the cycling or tandem cycling community whom we routinely ride with as friends. Life’s like that… and we get it. The off-road tandem community is also one we’ve left behind. So, the Ventana off-road tandem will be leaving the house. The only question is, will it simply be one less bike or will we take a shot at cracking open a new chapter with a more versatile tandem we can use to ride on any type of road — paved, gravel or dirt — without having to clench our teeth because our bike has tires that are too narrow for those off-the-beaten-path conditions.
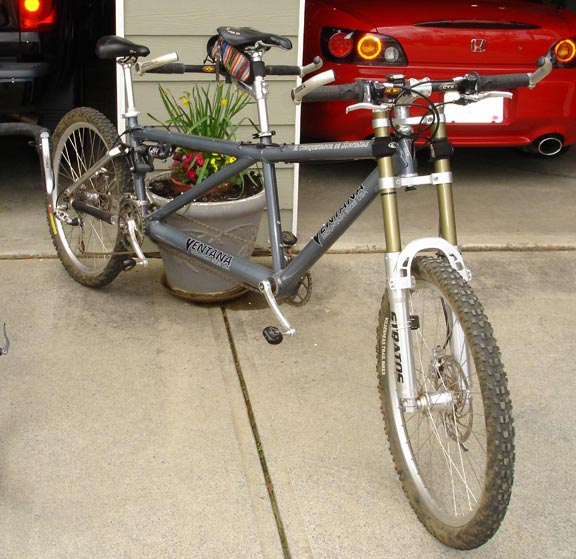
 Our 2002 Ventana El Conquistador de Montanas, (King of the Mountain) custom. As mentioned, when our friend Alex Nutt decided to become the 1st boutique off-road tandem dealer in the U.S. (and probably the world), we helped him get his internet / home-based business started, to include ordering what was the very first MTB Tandem sold. I knew Sherwood Gibson at this point and we worked out the specs for this tandem over the phone and, to the best of my knowledge, it’s the 1st (and perhaps only) “Signature” Ventana, as I asked Sherwood to sign the frame with a Sharpie before he shipped it out. We still own it, but don’t ride it that often as Debbie lost her off-road tandem mojo a few years back.
Enter The GiGi, Our Potential Life Line to Tandem Cycling & Travel.
So, that’s where the GiGi comes into the picture: can it provide us with a way that we can individually reconnect with travel, getting exercise and cycling together in a way that the tandems we already own haven’t seemed to achieve?
The Calfee road tandem, as awesome as it is, seems to have been pigeonholed as a “road tandem” intended to be used on smooth roads around the house for exercise and fitness or, if they ever resume again, a vehicle that affords us an opportunity to visit with friends at tandem cycling events that cater to road cyclists.
The Precision Triplet is pretty much just a replacement for the Calfee at road cycling events where we have our friend Lisa available as a stoker. At one time it was Lisa and one other friend who often found herself “alone” for a tandem event as her significant other had a work schedule that interfered. She has since joined him in his working situation, which leaves us with just 2 or 3 times a year when we pull the triplet down for a ride.
The Ventana… well, you now know all there is to know about that bike and why it’s been essentially collecting dust aside from a half-dozen rides of 10 miles or less that it’s been on over the last 10 years.
And then there are my single bikes, 4 road bikes and 2 off-road bikes… all of which I truly enjoy, especially my time spent on the road single bikes a few days a week.
The hope is, travel plus a all-roads tandem will cause us to visit more places with an eye towards simply getting out and enjoying ourselves in a way that riding a motorcycle or taking some other “type” of trip or vacation doesn’t seem to inspire. We’ll see. The GiGi is certainly an amazing, well thought out machine worth of riders who will be able to take advantage of its long legs and adventure touring capabilities. The question that we have to answer is, will WE be able to make good use of it’s long legs and adventure-seeker touring capabilities or will it just become another dust collector, er… make that a very expensive dust collector at a time when we’ve got other financial considerations and demands hitting us from both expected events and some unexpected events.


 However, what’s changed over the years is the size and weight of the batteries, e.g., just the Lights & Motion ARC Li-ION battery weighs 350 grams, or 3/4 of a pound. Again, they still work just fine, but the large batteries have to be strapped to the bicycle frame as well as the actual lights they’re connected to via wires, or if the light is mounted on your helmet, the heavy battery needs to go in your center, cycling jersey or jacket pocket again… connected via a long wire. The current bicycle lighting systems have benefited greatly from battery technology that now packs all of the power of those 12+ year-old lights into a much smaller and lighter-weight, fully self-contained device that uses a small USB cable for re-charging.
 What I ended-up buying was something of a “matched system” from Cyrolights: a 90 lumen taillight and a 520 lumen headlight. These are very compact systems that have newer battery technology that allows them to be a fraction of the size, bulk and weight of our old systems (e.g., the Dash weighs 79 grams), with the same brightness and even better running time that are charged using a USB cable plugged into…. whatever. So, at STR in Tupulo, MS, we’ll be sporting some new lighting. And, best of all, they are very easy to move from bike-to-bike so perhaps I’ll feel a bit more bold when it comes to riding my road bike with these really bright lights available.
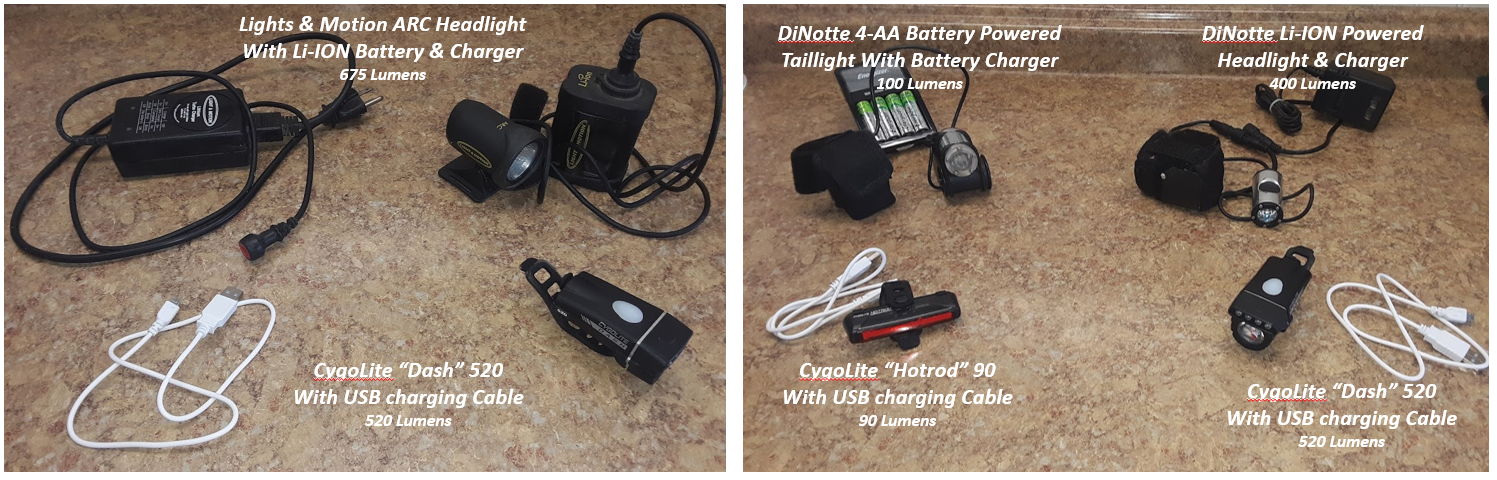


 Sidi Dominators by stripping off the old treads and doing a glue & screw with some replacement treads as I did on my Frankenshoes I project.

 As for my 11-year old Garmin Edge 705 that began to have “issues” with that I suspected were battery related, the replacement battery arrived last Wednesday. The installation was relatively easy and I also took some time to purge the GPS satellite data to eliminate some of the issues with how long it takes for the device to sync up with the satellite GPS signals.


 Those shoes have subsequently


 I still have 5 of the old ones left, with a collection of wiring harnesses, pick-ups, mounts, etc., but Lord knows why: I’m a bit of a packrat despite many purges.
 The Sigma Sport 1200’s were replaced by a pair of today’s version of the inexpensive computer, a wireless 11-function InBike LK-61172. They are a cheap knock-off of someone else’s design sold under many brand/model names and numbers. In fact, they’re so inexpensive they don’t even bother marketing a second mounting kit. Again, these are for the mountain bike so low-tech and cheap is fine by me.


We Need More-Useful “Share the Road” Signs
[3.21.22] 1.5-Min Read: Yesterday’s ride reaffirmed we need more useful and instructional “Share the Road” signage on our roads. Few motorists in Georgia have a hot-clue there is such as a thing as a 3-Foot Rule, never mind how to follow it even if they did.
But, then again, far too many motorists eschew adherence to traffic and motor vehicle laws that it may be somewhat pointless. I swear, it seems like far too many motorists are in a hurry to get to the next traffic light so they can sit there for 2 minutes and check their phones, despite all of the self-imposed agitation they created when they were delayed for 10-seconds by a cyclist. Why it is people can waste hours of their lives killing “dead time” on Facebook or watching/streaming entertainment programming, but struggle with being inconvenienced by a fellow-human being out riding a bicycle who delays their drive by a few seconds to the point where drive in manner that puts a life at risk?
Honestly, how hard is it to develop signage that’s instructive and informative? I think it took me all of 10-minutes to throw the one at right together, and traffic management, signage or behavior management is hardly something “in my swim lane” of training or work-experience.
I already did something of a “rant” on this at my other blog nearly a month back that I suspect most who follow this blog may have already seen and read, but this one is really stuck in my craw. While what I’ll call the majority of motorists will pass safely when there’s no on-coming traffic, there are still too many who even when there’s no reason to do so pass far-too close.
I’m not sure if it’s because they’re more afraid of crossing the double-yellow line than they are of hitting a cyclist or what the deal is, but we’ll have some motorists who could easily pass safely who seemingly don’t understand that it’s OK to cross the double-yellow. Instead, some motorists will just sit behind us, backing-up traffic and the people in the cars being held-up aren’t upset with the motorist who doesn’t know the rules of the road or how to exercise good driving judgement and skills, no… it’s the cyclist’s fault for being there.
But it truly grinds-my-gears every time I see the current crop of “Share the Road” signs that use a warning sign shape, color and de-humanized bicycles that aren’t even on par with animal crossing warning signs that at least use the silhouette of a recognizable, living creature as an attention-getter. Honestly, we can and should to better.
And, just to make the point about being held-up by a cyclist, it proably took less time to read this blog entry than how-long someone sits at a red light. How often are motorists delayed for that much time waiting until it’s safe to pass a one or two cyclists on a two-lane road with light to moderate traffic? And, don’t get me started on large group rides that DO back-up traffic and create a lot of angst directed at lone cyclists because of it.